
Documentation
Neural Forms is a modern form builder for WordPress that transforms your contact forms into an AI-powered lead management system. Beyond just collecting submissions, it uses AI to summarize messages, assign priority levels, and draft responses automatically.
How to use Neural Forms
This is a quick start guide to help you go from install to your first working form in under 10 minutes.
Getting started
Step 1: Install Neural Forms
- Automatic Installation:
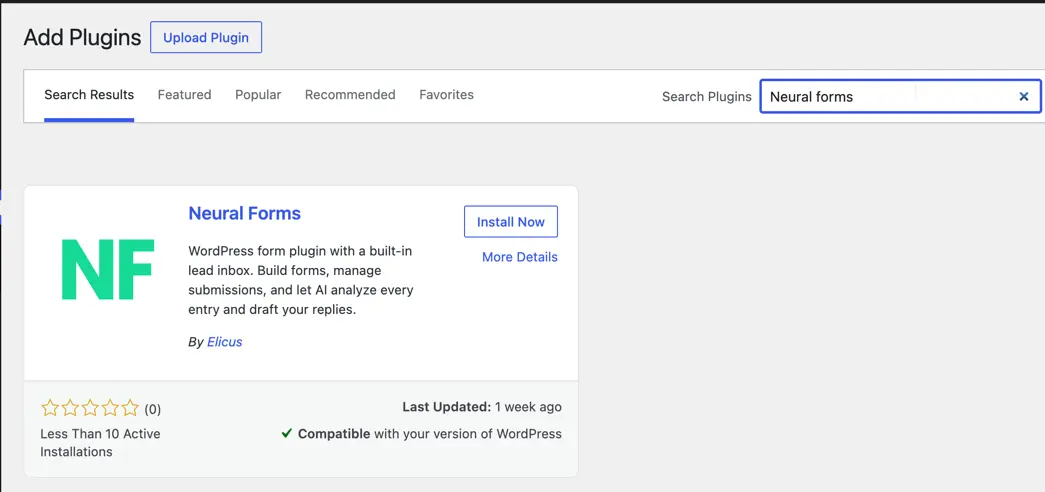
- Go to Plugins > Add New in your WordPress Dashboard.
- Search for “Neural Forms”
- Click Install Now, and then Activate.
- Manual Installation:
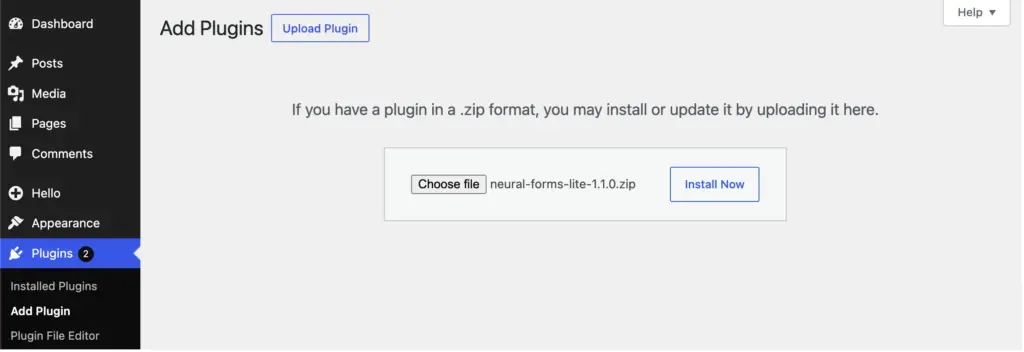
- Download the plugin .zip file directly from WordPress.org.
- Go to Plugins > Add New > Upload Plugin.
- Choose the .zip file, click Install Now, and then Activate.
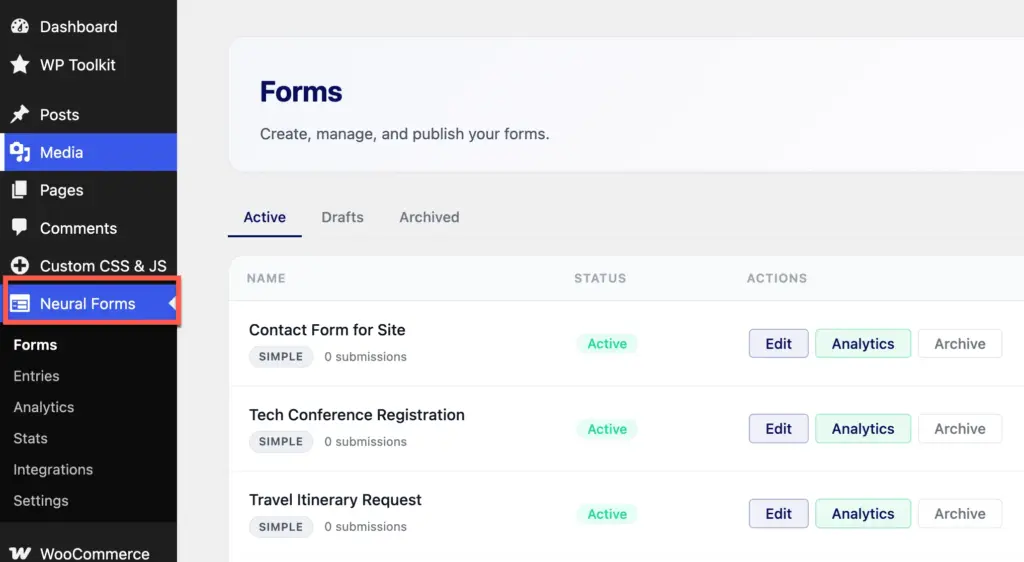
Once activated, you will see a new “Neural Forms” menu item in your WordPress admin sidebar.
Step 2: Create your first form
You have two options:
Option A: Start from a template
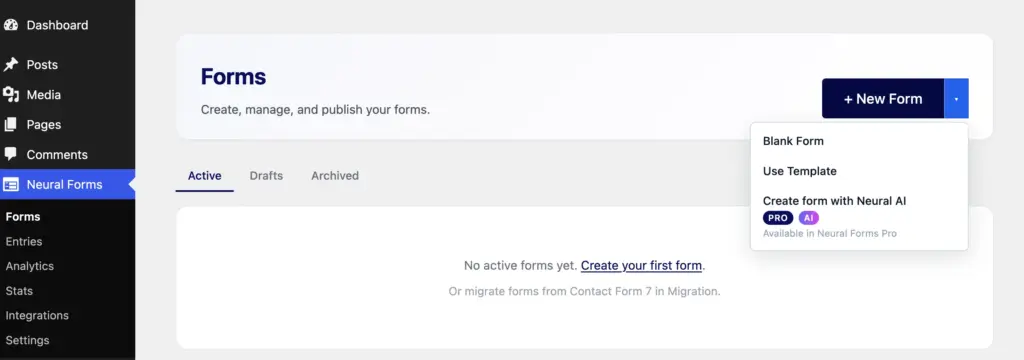
- Navigate to Neural Forms > Forms > Blank Form or Use Template in your WordPress admin.
- Browse the pre-designed templates.
- Click Import on any template you want to use.
- The plugin will import the form and automatically create a WordPress draft page with your new form embedded.
Option B: Build from scratch
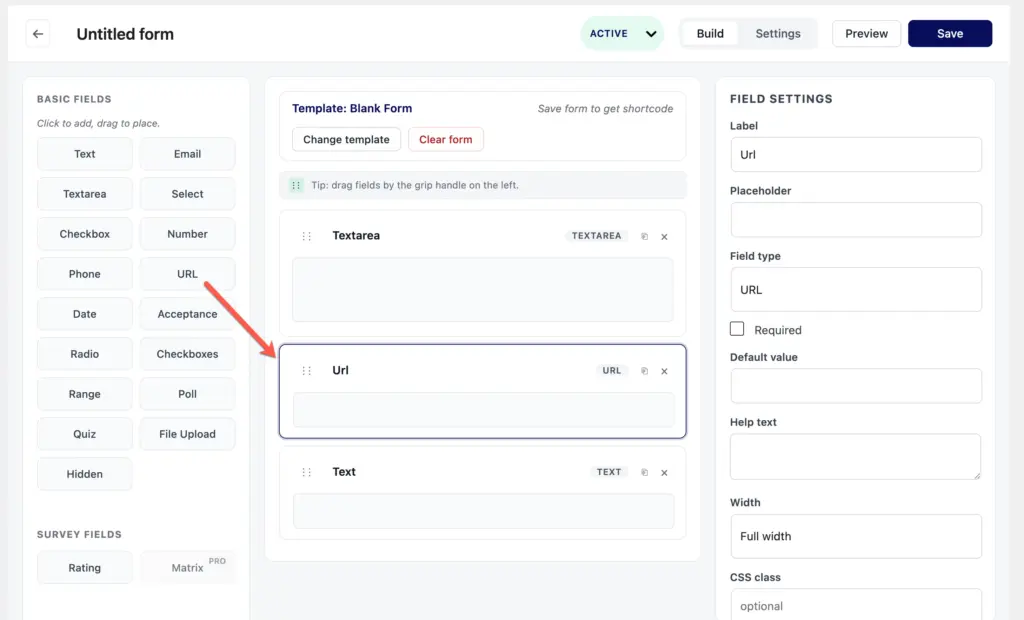
- Navigate to Neural Forms > Forms and click Add New to launch the Visual Builder.
- Visual Builder: Drag and drop fields from the field library on the left sidebar onto the center form canvas.
- Configure Fields: Click on any field on the canvas to open its settings panel on the right. Here you can edit labels, placeholder text, description, and validation rules.
- Configure Settings: Click the Settings tab at the top of the builder to configure form-specific options such as email notifications, confirmation messages, success message, error message and CAPTCHA.
- Publish: Click Save to publish the form and generate its unique form ID.
Step 3: Embed your form
You can embed your form anywhere on your site using one of three methods:
Method 1: Using block (recommended)
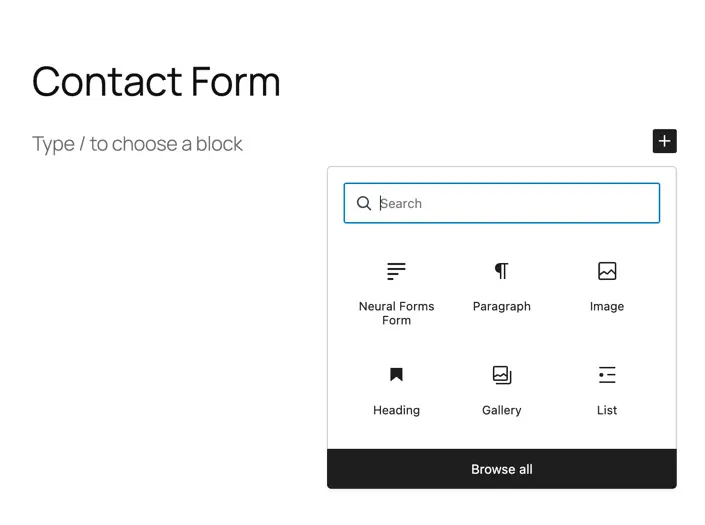
- Open any page or post in the WordPress block editor
- Click the plus button to add a new block
- Search for “Neural Forms” and select the block
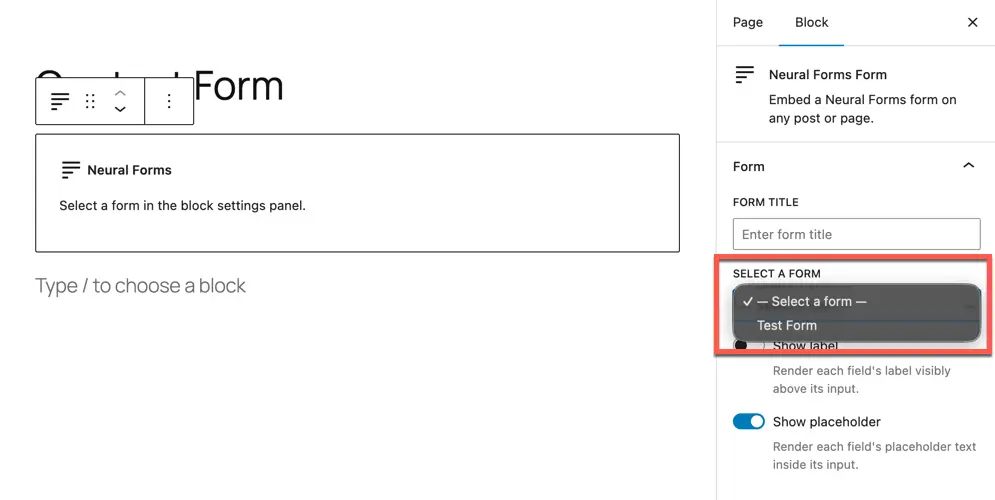
- Choose your form from the dropdown
- Customize the styling using the block settings panel on the right
Method 2: Shortcode
Add the following shortcode to any location that supports shortcodes (such as the classic editor, widgets, or page builder code modules):
This form is currently unavailable. Please try again later.
Replace YOUR_FORM_ID (e.g., 42) with the actual form ID found next to your form name in Neural Forms > Forms.
Method 3: Divi 5 module (Pro)
If you have the Divi 5 theme and Neural Forms Pro, use the Neural Forms module inside the Divi Visual Builder. Search for “Neural Forms” in the module library.
Working with form fields
Neural Forms includes 18 field types in the free version:
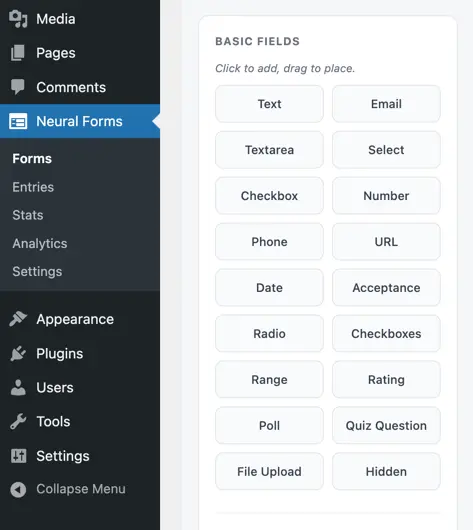
- Text: single-line text input
- Email: email address with validation
- Textarea: multi-line text input
- Select: dropdown menu
- Checkbox: single yes/no checkbox
- Checkboxes: multiple options the user can select
- Radio: single option from multiple choices
- Number: numeric input with min and max
- Phone: phone number with format validation
- URL: web address with format validation
- Date: date picker
- File Upload: let users attach files
- Range: slider for numeric range selection
- Acceptance: agreement checkbox for terms and conditions
- Hidden: pass values without showing them to users
- Rating: star or numeric rating scale
- Poll: collect single or multiple choice opinions with results tracking
- Quiz: create scored quizzes with correct answer logic
To add a field, drag it from the field library on the left into the form canvas in the center. Click any field to configure its label, placeholder, validation rules, and other settings.
Multi-step forms
To break a long form into multiple steps:
- Open your form in the builder
- Drag a Step block from the field library into the form
- Place fields under each Step
- Save the form

Visitors will see a progress indicator and Previous and Next buttons as they move through the form. Each step validates its fields before allowing the user to proceed.
Managing your lead inbox
Every form submission lands in the Neural Forms inbox.
To access your inbox:
- Go to Neural Forms > Entries in your WordPress admin
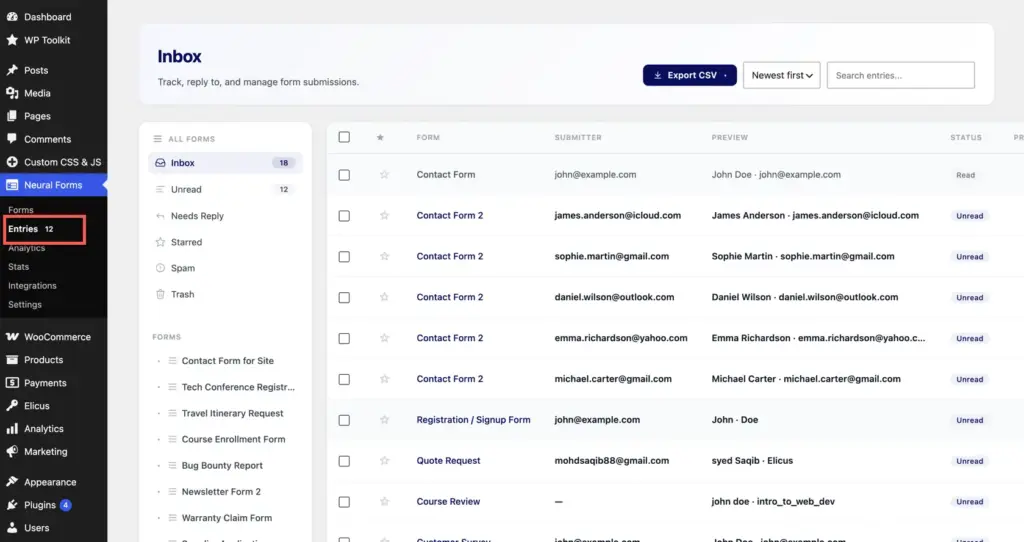
What you can do in the inbox:
- View all submissions across all forms in one place
- Filter by form using the left sidebar
- Filter by status: new, read, spam, trash
- Star important leads to mark them for follow-up
- Search submissions by keyword
- Filter by date range
- Open any submission to see the full content
- Reply to a submission directly from the entry detail view
- Mark entries in bulk using checkboxes and the bulk actions menu
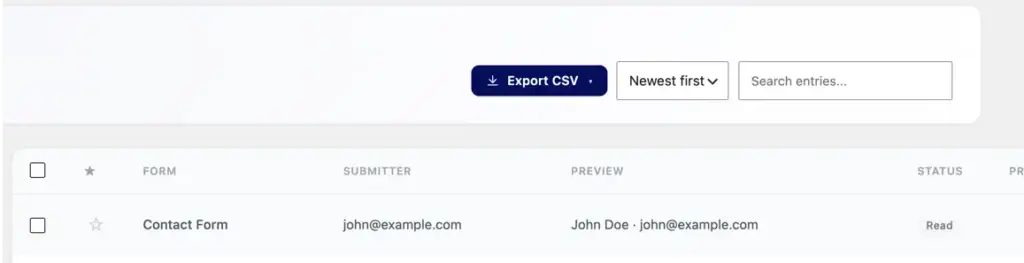
To export entries:
- Open the inbox and select a form from the sidebar
- Filter by date range if needed
- Click Export CSV at the top of the entries list
- A CSV file downloads with all matching entries
Setting up AI features
AI features are optional. They give you automatic submission analysis, draft replies, and spam detection.
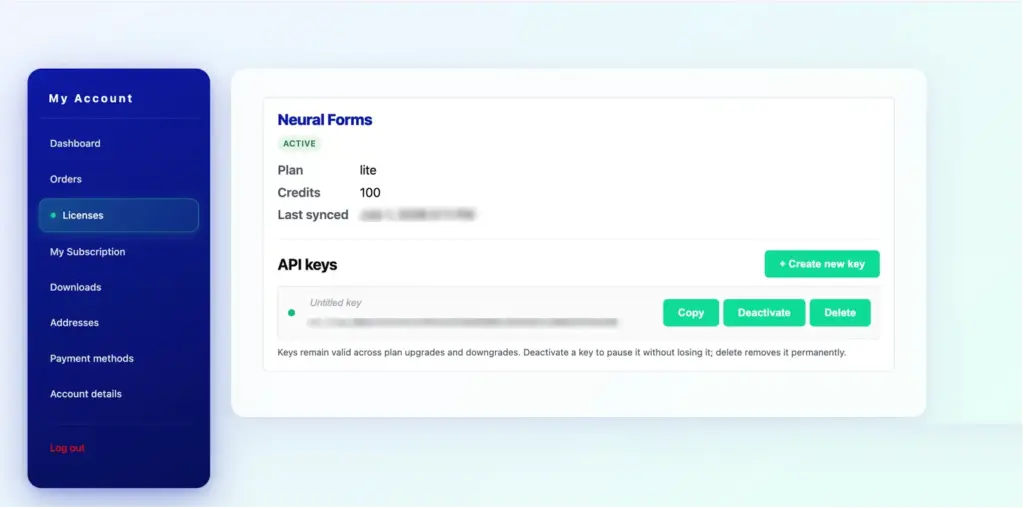
How to get your free Neural AI API key
- Go to neuralforms.ai and click on the Download Free button to download the Lite version of the plugin.
- Fill in the required details during the download process. This will automatically create your Neural Forms account.
- Once your account is created, log in to your dashboard, navigate to the Licenses section, and copy your free API key.
How to activate your free Neural AI API key
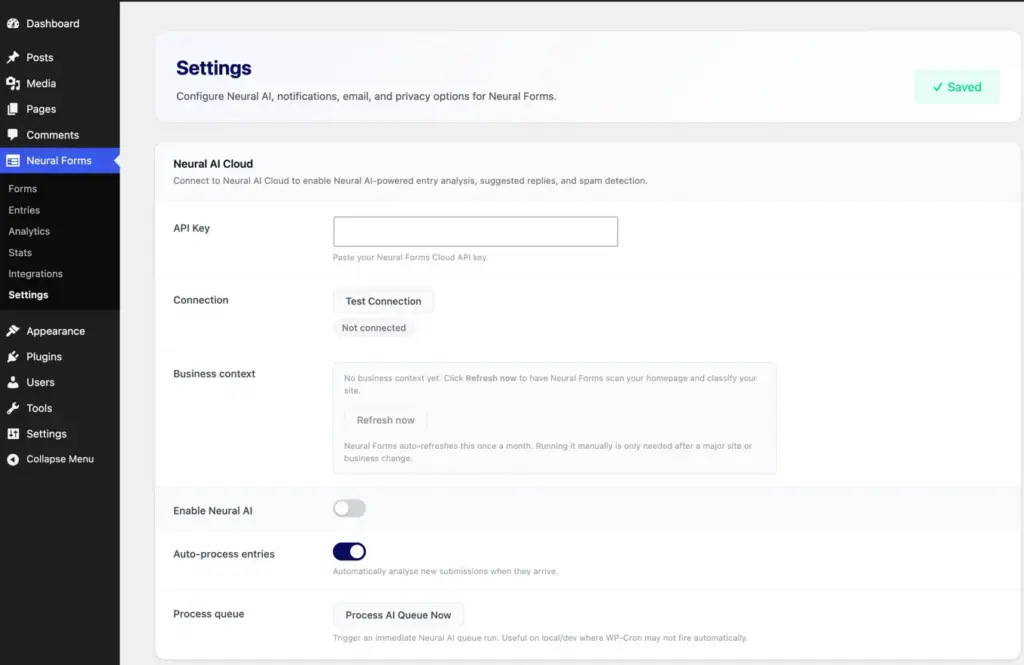
- Log in to your WordPress administrator dashboard and go to Neural Forms > Settings.
- Paste your copied API key into the API Key input field.
- Click the Test Connection button to verify that your connection is successful.
- Click Save Settings to complete the setup and activate the Lite features of Neural AI on your website.
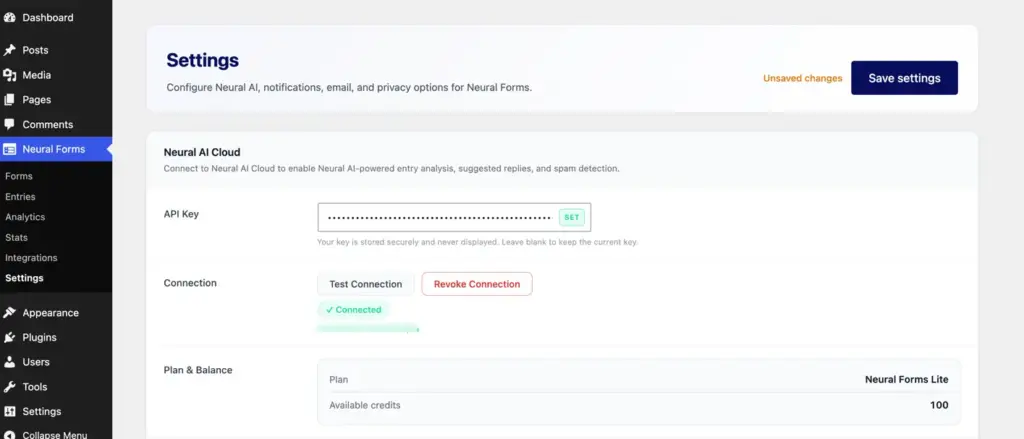
Once connected, you will see 100 free AI credits available on your account. Every form submission consumes one credit. Once your free credits are used up, AI features pause until you upgrade to Starter or Agency.
What AI does on every submission:
- Generates a one or two sentence summary of the submission
- Assigns a category (such as inquiry, support, sales, complaint)
- Calculates a priority score from 0 to 100
- Drafts a reply you can review and send
You always stay in control. The AI drafts and suggests. You decide what to send.
Form submission outcomes
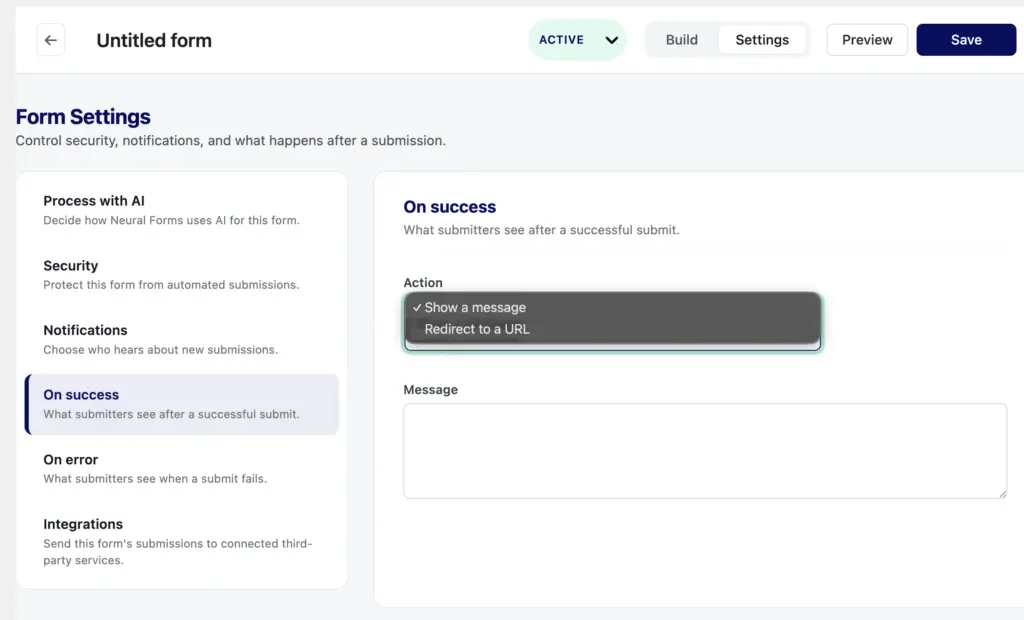
When creating or editing a form, you can configure how the form behaves immediately after a visitor clicks the Submit button. Under the Settings tab at the top of the Visual Builder, locate the Submission Outcomes section, which allows you to customize the behavior for both successful submissions and submission errors.
On success settings
This controls what happens when the form is submitted successfully and passes all validation checks:
- Mode (Display Message or Redirect):
- Message: Keeps the user on the same page and displays a custom success message inline (replacing or overlaying the form).
- Redirect: Redirects the user to a different page or external URL immediately after submission (e.g., a “Thank You” page).
- Success Message: The text displayed when the mode is set to “Message”. If left empty, it falls back to:
"Thank you! Your submission has been received." - Redirect URL: The target URL where the visitor will be sent when the mode is set to “Redirect”.
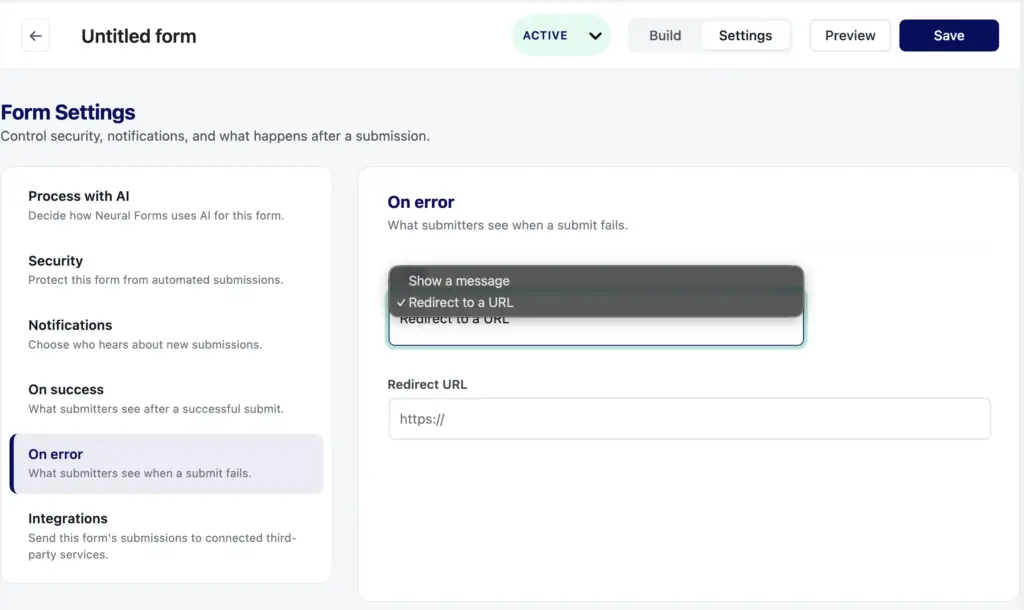
On error settings
This controls the global form behavior if the submission fails (for example, server errors, API limits, or spam detection blocks):
- Mode (Display Message or Redirect):
- Message: Displays a custom error message inline on the form to notify the visitor of the issue.
- Redirect: Redirects the visitor to a specific error handling page.
- Error Message: The text displayed globally on the form when the mode is set to “Message” and the submission fails.
- Redirect URL: The target URL where the visitor will be sent when the mode is set to “Redirect” on failure.
Setting up email notifications
To get notified when someone submits a form:
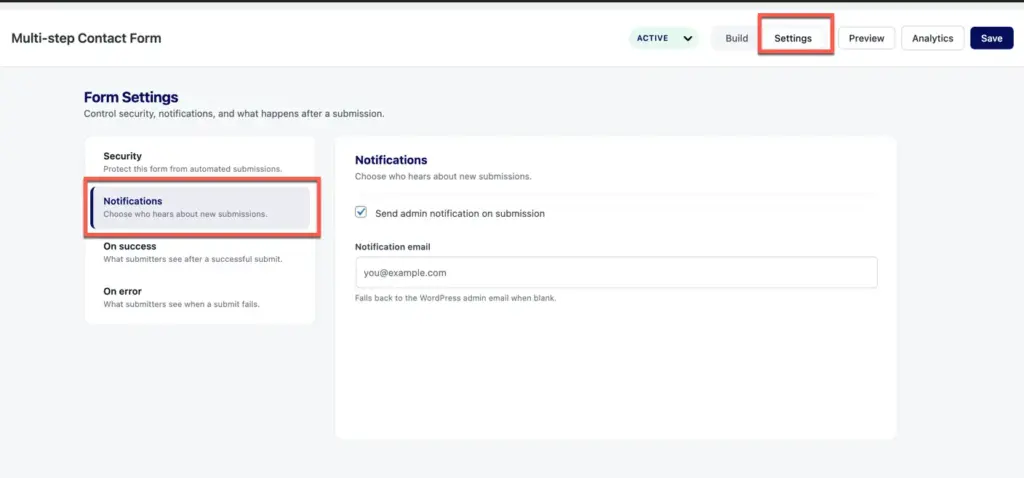
- Open your form in the builder
- Click the Settings tab at the top
- Open the Notifications section
- Configure the admin notification email: who receives it, subject line, body content
- Optionally enable the autoresponder to send the visitor a confirmation email
- Use tokens like {site_name}, {form_name}, and {field_id} to insert dynamic content
- Save the form
You can also configure the From name and From email used for outgoing notifications.
Adding spam protection
Neural Forms supports two CAPTCHA providers in the free version:
Cloudflare Turnstile (recommended)
- Sign up at cloudflare.com and create a Turnstile site
- Copy your site key and secret key
- In WordPress, go to Neural Forms > Settings
- Select Cloudflare Turnstile as your CAPTCHA provider
- Paste your site key and secret key
- Save settings
The CAPTCHA will now appear automatically on all your forms.
Google reCAPTCHA v2
- Sign up at google.com/recaptcha and create a reCAPTCHA v2 site
- Copy your site key and secret key
- In WordPress, go to Neural Forms > Settings
- Select Google reCAPTCHA v2 as your CAPTCHA provider
- Paste your site key and secret key
- Save settings
For paid plans, Neural Forms also includes AI spam detection that analyzes submission content for spam patterns without requiring a CAPTCHA challenge.
Migrating from Contact Form 7
If you already use Contact Form 7, you can migrate your forms in one click:
- Go to Neural Forms > Migration
- Click Scan for CF7 Forms
- Review the detected forms
- Click Import on each form you want to migrate
The migration tool maps fields, labels, and validation rules automatically. Your original CF7 forms are not modified or removed. You can keep both plugins active and migrate forms at your own pace.
Privacy and GDPR
Neural Forms includes privacy controls to help with GDPR and similar regulations:
To enable Privacy Mode:
- Go to Neural Forms > Settings
- Open the Privacy section
- Toggle Privacy Mode on
- Save settings
When Privacy Mode is on, the plugin stops storing visitor IP addresses and user-agent strings with form submissions. Form content is still stored as usual.
Important notes:
- You are responsible for your site’s privacy policy
- Inform your visitors what data your forms collect
- Disclose whether you have enabled AI processing for form submissions
- Obtain any consent required by applicable law
For full data handling details, see our privacy policy.
Neural forms pro
Welcome to Neural Forms Pro! This premium add-on extends the capabilities of the free Neural Forms Lite plugin by unlocking powerful AI-driven workflows, deep Divi 5 integration, and native lead integrations.
Key premium features
Here is a list of the new features unlocked when you install and activate the Pro version:
1. Divi 5 module integration
A native Divi 5 module designed specifically for the new Divi 5 framework. It allows you to embed any of your custom forms directly inside the Divi 5 Visual Builder layout without using shortcodes.
2. AI spam detection
Smart spam protection processed in the cloud. It automatically classifies form submissions as spam in either Suggest or Auto modes. High-confidence spam matches are automatically routed to the Spam folder, keeping your main inbox clean.
3. AI Re-Analyze for entries
On-demand AI analysis refresh. It allows you to manually trigger a re-analysis on any form entry to refresh or recalculate the summary, category, priority level, and spam/quality score.
4. AI reply polish
AI-powered email writing assistant. It refines and polishes your draft replies to form entries, ensuring your emails are professional, clear, and context-aware.
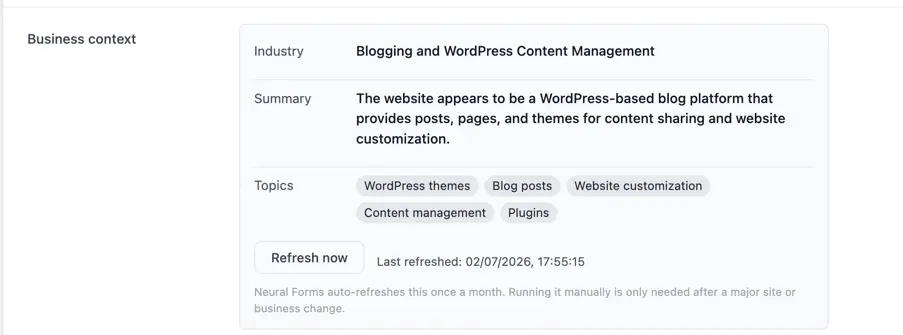
5. Business aware site-Profile classifier
Automatic business context learning. It scrapes your site’s pages once a month (or manually on-demand) to create a custom profile. The AI uses this context to make suggested replies and entry analysis highly desktop/mobile tailored to your specific business niche.
Lead Integrations (Pro Features)
Pro plans add five native integrations that pass leads to your other tools, allowing form submissions to go further than your inbox. When a new form submission comes in, Neural Forms can automatically add or update details in:
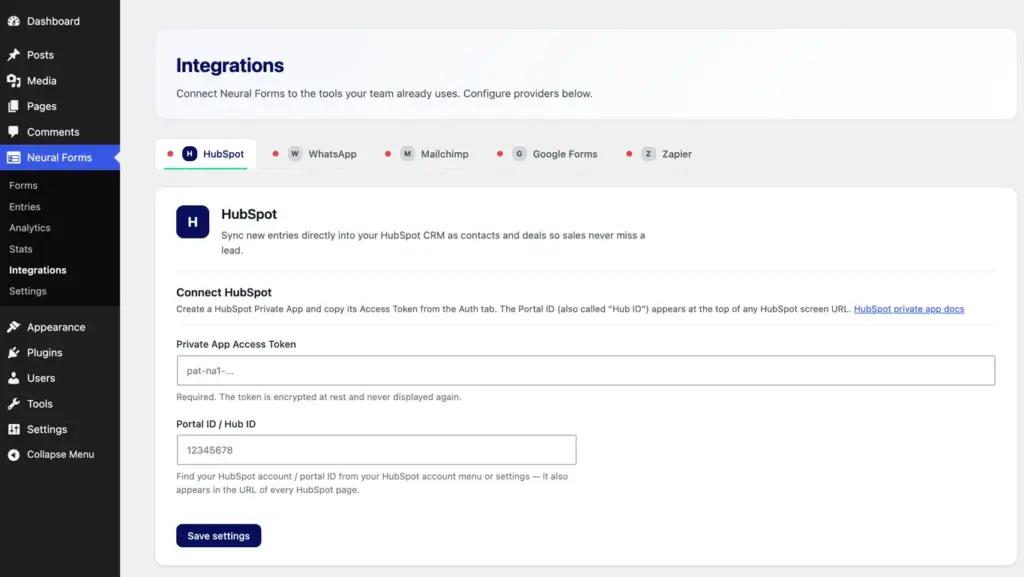
- HubSpot: Create or update contacts inside your HubSpot CRM.
- Mailchimp: Add new subscribers directly to your selected Mailchimp audiences.
- Zapier: Connect Neural Forms to thousands of other apps you already use, opening up endless options for managing your form data.
- WhatsApp: Sends you a direct message when a new submission arrives, allowing you to view new leads instantly without opening your WordPress dashboard.
- Google Forms: Rounds out the five integrations. You only need to set up each connection once, and it will run automatically on every matching submission.
External cloud services (api.neuralforms.ai)
All AI capabilities in Neural Forms Pro run through Neural Cloud AI. When AI features are active, content from form submissions is sent securely to api.neuralforms.ai for analysis. Disabling the “Cloud AI” toggle in the main settings stops all network requests to the cloud.
How to setup and use Neural Forms Pro
Follow these steps to configure and start using the Pro features:
Step 1: Install & Activate the Plugins
- Ensure Neural Forms Lite is installed and activated.
- Activate Neural Forms Pro through the WordPress Plugins screen.
Step 2: Activate Your License Key
- Navigate to Neural Forms > Settings.
- Paste your license key purchased from Elicus and click Saved. Once verified, all premium features will unlock.
Step 3: Embed Forms in Divi 5 Visual Builder
Neural Forms Pro provides 4 dedicated, native modules. These modules allow web creators to visually embed, configure, and design forms, multi-step wizards, polls, and quizzes directly inside the Divi Visual Builder without using shortcodes.
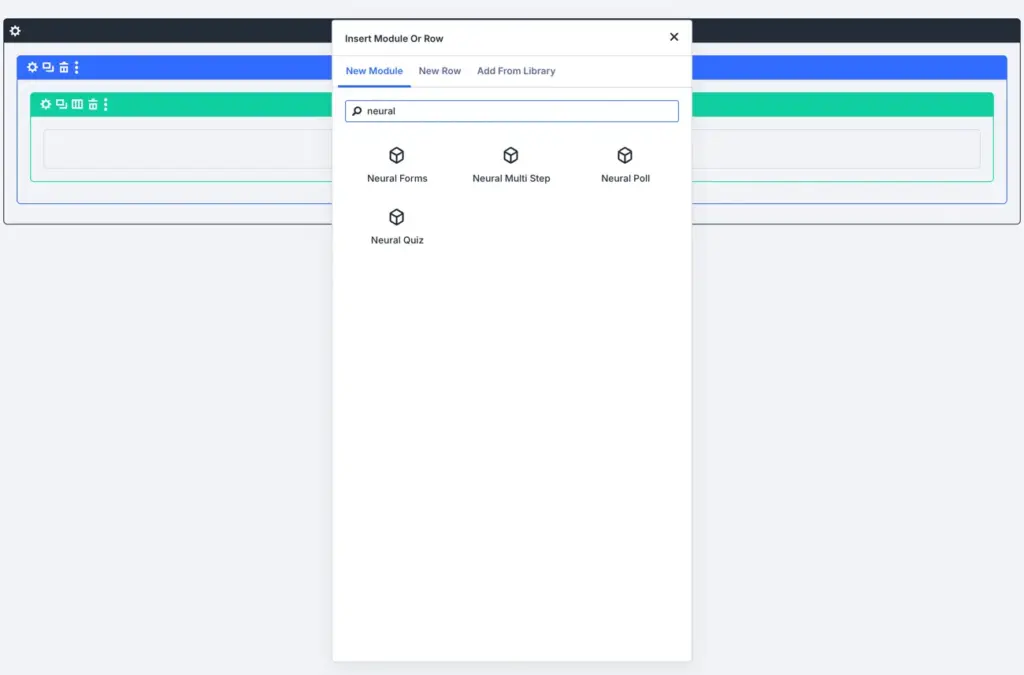
1. Neural Form Module (Neural Forms)
This is primary form embedding module. It enables you to select any form created in the Neural Forms dashboard (Contact Forms, Lead Capture Forms, Feedback Forms, etc.) and style every element natively using Divi Builder controls.
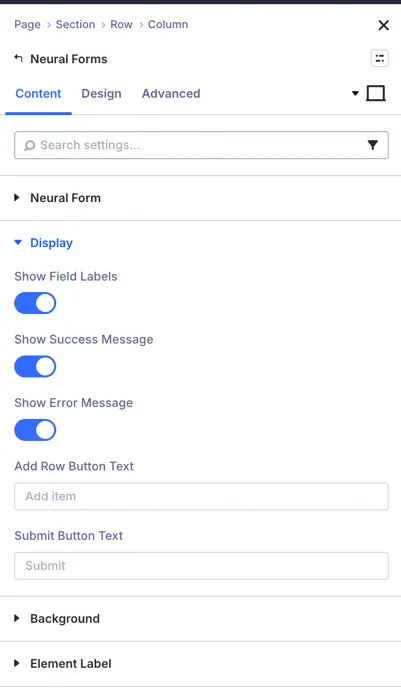
Key features and settings
- Form Selection: Select any existing form from the dropdown menu.
- Label Controls: Show or hide field labels globally.
- Custom Submit Button Text: Override the default submit button text per module instance.
- Native Divi Styling Controls:
- Form Wrapper & Title: Customize background, padding, border, box-shadow, and typography for the form title.
- Input Fields & Textareas: Complete control over font, background color, border width/color, focus states, and placeholder styles for text inputs, dropdowns, and textareas.
- Checkboxes & File Uploads: Custom styling for acceptance checkboxes, file upload drop zones, and file-selector buttons.
- Repeater Fields: Style repeater items, add-row, and remove-row buttons dynamically.
- Success & Error Messages: Custom typography, background colors, and borders for submission response alerts.
2. Neural Multi-step Form Module (Neural Multi-step Form)
Designed specifically for multi-step forms (wizards). Ideal for long, detailed forms such as onboarding workflows, application forms, or multi-page surveys by breaking them down into manageable steps.
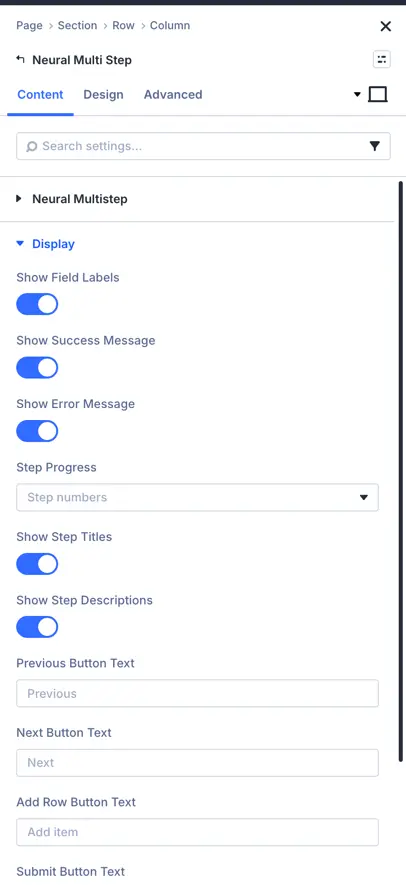
Key features and settings
- Progress Indicator Customization: Override progress bar styles (step numbers, progress bar line, or step dots).
- Step Labels & Descriptions: Toggle step titles and step description visibility.
- Step Transition Animations:
- Transition Type: Choose between
Slide,Fade,Zoom, orNone. - Direction & Duration: Adjust slide direction (Horizontal/Vertical) and animation duration in milliseconds.
- Easing Effects: Select transition easing curves (
ease-in-out,linear,cubic, etc.).
- Transition Type: Choose between
- Step Navigation Buttons: Independent styling controls for Next, Previous, and Submit buttons (Fonts, Colors, Hover States, and Button Icons).
3. Neural Poll Module (Neural Poll)
Dedicated module for interactive polls and voting widgets. Allows visitors to cast votes and view live results directly on the page.
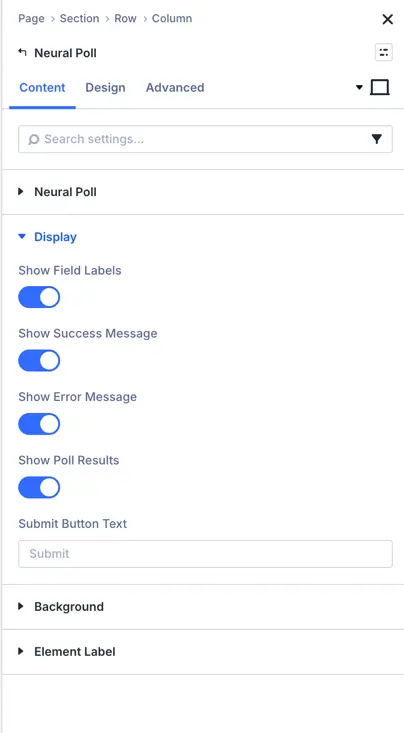
Key features and settings
- Poll Selection: Choose a specific poll form from your saved poll forms.
- Results Display Controls:
- Choose whether to show voting results before or after submission.
- Toggle vote counts and percentage (
%) bars visibility.
- Poll Option Cards Styling:
- Normal & Selected States: Customize borders, background colors, and shadows for unselected vs. selected option cards.
- Progress Bar Fill: Customize progress bar fill colors for winning vs. standard option percentages.
- Vote Button Customization: Full styling controls for the vote submission button.
4. Neural Quiz Module (Neural Quiz)
Designed for quizzes, assessments, and interactive questionnaires (e.g., knowledge tests, product recommendation quizzes).
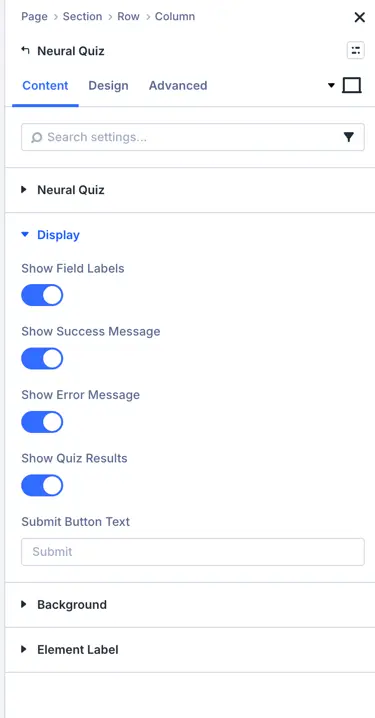
Key features and settings
- Quiz Selection: Select any quiz form created in Neural Forms.
- Score & Results Screen Styling:
- Style the final result summary card, score text, and pass/fail badges.
- Customize correct vs. incorrect answer feedback messages and colors.
- Quiz Question Cards:
- Full typography and container styling for question cards, option choices, and active timers (if enabled).
- Restart & Submit Buttons: Custom styling for the “Take Quiz Again” and “Submit Quiz” buttons.
Features
- No Shortcodes Required: Easily select any form from a dropdown inside Divi Builder without manually copying shortcodes like
[neural_form id="123"]. - Real-time Live Preview: View your form rendered live inside the Divi Visual Builder as you customize styles.
Step 4: Configure AI Spam & Site Profiler
- Go to Neural Forms > Settings.
- Enable AI Spam Detection and choose your preferred mode (Auto-move to spam or Suggest).
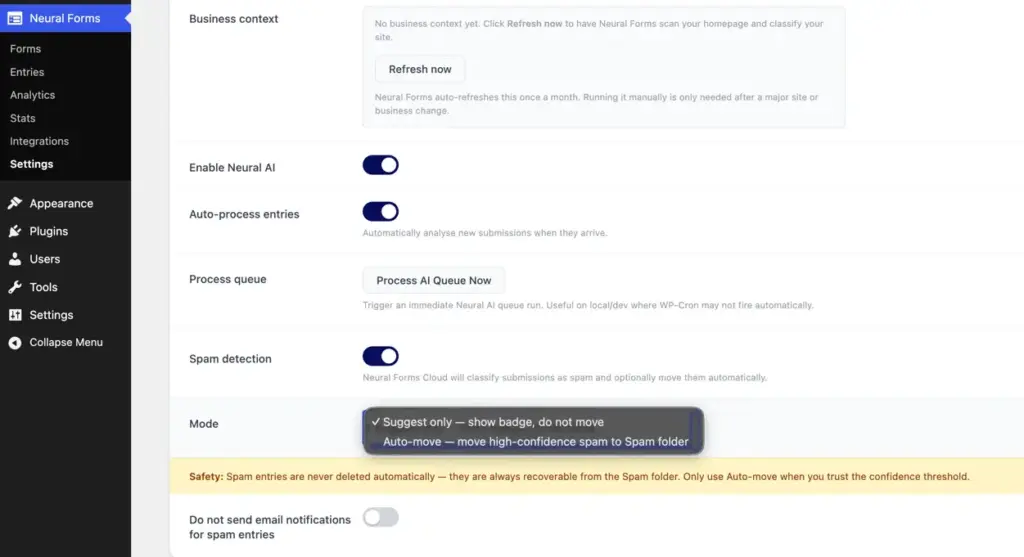
- Under the Business context section, click Refresh Now to let the AI learn about your business context from your homepage.
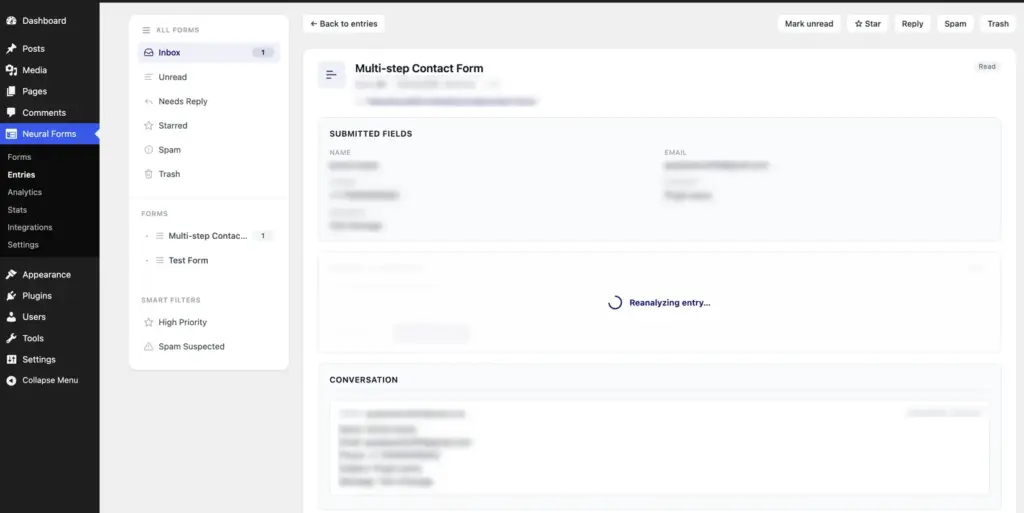
Step 5: Using AI in Entries (Re-Analyze & Reply Polish)
- Go to Neural Forms > Entries and click on any submission.
- Click Re-Analyze on the sidebar to recalculate the AI summary or priority level.
- When replying to an entry, draft your response in the editor and click AI Polish to refine the tone and formatting before sending.
Troubleshooting common issues
My form is not appearing on the page
Make sure you selected the correct form in the Gutenberg block or used the correct form ID in the shortcode. The form ID is shown next to each form in Neural Forms > Forms.
I am not receiving notification emails
Check that your WordPress site can send email. Many hosts require an SMTP plugin to reliably deliver emails. Test by going to Neural Forms > Settings > Notifications and clicking Send Test Email.
My AI features are not working
Verify that your Neural Forms API key is entered correctly in Settings. Click Test Connection. If the test fails, log into your account at neuralforms.ai and confirm the API key is active. Also check that you have AI credits remaining on your account.
The CAPTCHA is not loading
Confirm your site key and secret key are entered correctly. Both Cloudflare Turnstile and reCAPTCHA v2 require both a public site key and a private secret key. Also check that your domain is registered with the CAPTCHA provider.
CSV export is not downloading
Some browsers block automatic downloads. Try in a different browser or check your browser’s download permissions for your WordPress admin domain.
Getting more help
For questions not covered here, use our contact form. Select the appropriate topic from the dropdown so we can route your question to the right team.
For Pro plan customers, priority support is available with one business day response time on weekdays.